Installation
Read SousaFX’s End User License Agreement.
Download Max 9 from Cycling ‘74.
Note
SousaFX & SousaVFX remain fully functional after Max’s 30-day trial ends.
Download Live Suite from Ableton.
Note
The SousaPlayback template project cannot be saved after Ableton Live’s 30-day trial ends. The template uses Max for live devices that require Ableton Live 11/12 Suite or Standard with the Max for Live addon.
Open Max, go to
Menubar > Max > Preferences..., and set the following preferences:Interface > Restore Windows on Launch [uncheck]
Mixer > Enable Mixer Parallel Processing [check]
Open Max’s Audio Status Window by clicking on
menubar > Options > Audio Status...and set your preferred driver, sample rate, and vector size. A sample rate of 48 kHz and a vector size of 128 is recommended. If the audio crackles during use then restart Max and try a vector size of 256.
Open Max’s Package Manager:
Menubar > File > Show Package Manager, and install the following packages:-
Note
Open the ISF package and download the editor & files.
Download Pix Shaders to your
~/Documents/Max 8/Packages/folder.
Download sousastep-0.10.2’s Source code (zip) to your
~/Documents/Max 8/Projects/folder. It contains SousaFX, SousaVFX, and SousaPlayback. If the/Max 8/Projects/directory does not yet exist, create it.
Note
Yes, SousaFX still uses the /Max 8/Projects/ folder even though it runs in the Max 9 app.
Rename
sousastep-0.10.2tosousastep.
Note
If you’re familiar with git then cloning the repo to your Projects folder is recommended.
Important
When updating to new versions of SousaFX,
copy all files from ~/Documents/Max 8/Projects/sousastep/SousaFX/data/
to the new version’s
sousastep/SousaFX/data/
folder, and repeat with /SousaVFX/, to ensure that user presets are carried over. This isn’t necessary if you clone the repo with git because the data folders are gitignored.
Add
/sousastep/to Max’s global search path. Go to Max’s menubar >Options... > File Preferences..., “Add Path” +, “choose”, and select~/Documents/Max 8/Project/sousastep.
Open Live, open its settings
Menubar > Live > Settings..., and set the following:Audio > Audio Device [select your audio interface]
Audio > In/Out Sample Rate [48000]
Audio > Buffer Size [256]
File Folder > Max Application > browse for
/Applications/Max.appLink Tempo MIDI > MIDI Ports
In: from Max 1 - Remote [check]
Out: to Max 1 - Track [check]
Link Tempo MIDI > Show Link Toggle [show]
Optionally, download Black Octopus Sound’s excellent free samples and place Black Octopus Sound - Free Samples Bundle into
~/Documents/Max 8/Projects/sousastep/SousaFX/default/SousaPlayback template Project/Clips/, or skip this step and use your own drum samples.
Optionally, download these free plugins:
Sonobus for networked jamming with folks in the same continent.
Jamtaba for networked jamming with folks in different continents.
Note
Sonobus or Jamtaba may be placed in SousaPlayback’s “NETWORK” track.
ToneLib BassDrive “Ready to unleash the true power of the lowest guitar frequencies.”
Valhalla Super Massive “Designed from the ground up for MASSIVE delays and reverbs.”
Kilohearts Essentials “A free collection of extremely useful effects.”
Melda Production “The biggest and most powerful free plugins pack available.”
Open
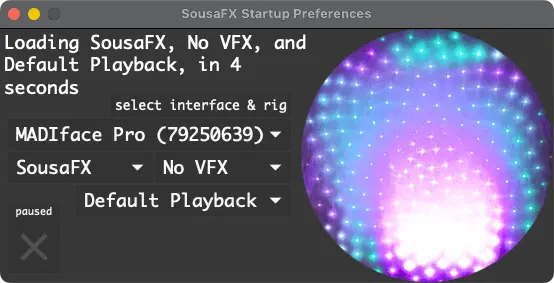
~/Documents/Max 8/Projects/sousastep/SousaFX/SousaFX.maxproj. SousaFX’s Startup Preferences window will appear.Select your preferred audio interface.
Uncheck the Startup Preferences’ pause button. SousaPlayback will appear within a minute, and SousaFX will appear in 2 - 5 minutes. SousaPlayback will automatically start playing the first scene once SousaFX launches.
In SousaPlayback, ensure that the Main and Monitor return tracks are routed to the audio interface’s Main and Headphone/Aux outputs, respectively.
Note
If the Black Octopus Drum Loops are installed then drum clips will be available in session view, but if they’re missing then feel free to delete them and add your own.
Important
Live Link should auto-enable thanks to the M4L device in the “tempo” track. However, one of Link’s Max objects glitches during discontinuous tempo changes, and although SousaPlayback has no discontinuous tempo changes by default, setting up SousaPlayback’s sync track is recommended if your audio interface has an available loopback channel.
Once SousaFX is running, open the Audio IO Status window.
Set the “live mic” input to your audio interface’s microphone input.
If you’re using headphones, set the “Monitor L & R” outputs to your audio interface’s headphone output.
If you’re using a loudspeaker or amplifier, set the “Main L & R” outputs to your audio interface’s main output.
17. Connect your game controller to your computer either wired or wirelessly. Check that the start/select buttons don’t trigger anything outside of SousaFX, such as Steam or your operating system. For example on MacOS Ventura or later, go to System Settings > Game Controller > Add New Profile > Share Gestures > Set “Double Press” to “Off” > Click “Done” > Scroll up to your controller and select it > Set “Use Profile” to the new profile > Click “Done”. Also note the “Buddy Controller” setting that allows two controllers to be used as one.
Now, it’s time for a soundcheck!